记录一下折腾Jenkins流水线过程中的一些笔记和心得。相比于自由风格任务,Jenkins流水线用代码来描述任务,并且支持从SCM中拉取代码,这样可以更快速的部署新任务,并对任务代码做版本控制。
¶Jenkins官方文档
主要参考内容是Jenkins官方文档。有中文版本,但汉化的不全,汉化版本可能也缺少内容。建议英文和中文配合一起看。刚开始对语法还不熟时,可以多看看流水线语法。
| 文档 | 英文版 | 中文版 |
|---|---|---|
| 流水线入门 | getting-started | getting-started |
| 流水线语法 | syntax | syntax |
| git插件 | git | git |
| Email Extension | email-ext | email-ext |
¶代码生成器
Jenkins提供了片段生成器和声明式指令生成器。在刚开始对语法还不是很熟悉的时候,这两个工具非常有用。
¶片段生成器
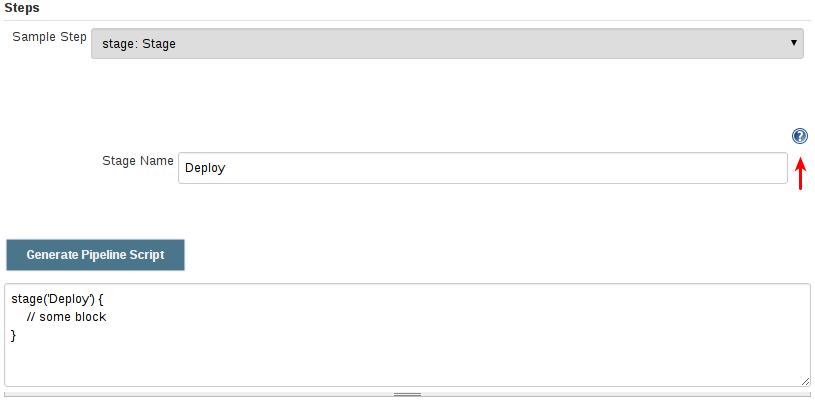
内置的“片段生成器”工具有助于为各个步骤创建代码段,发现插件提供的新步骤,或者为特定的步骤尝试不同的参数。
片段生成器由 Jenkins 实例中可用的步骤动态添加。可用的步骤的数量依赖于安装的插件,这些插件显式地公开了流水线中使用的步骤。
要使用代码生成器生成一个步骤的片段:
- 从已配置好的流水线导航到 流水线语法 链接(见上),或访问
${YOUR_JENKINS_URL}/pipeline-syntax。- 在 示例步骤 下拉菜单中选择需要的步骤。
- 使用 示例步骤 下拉菜单的动态填充区来配置已选的步骤。
- 点击 生成流水线脚本 生成一个能够被复制并粘贴到流水线中的流水线片段。
¶声明式指令生成器
片段生成器可以帮助生成脚本式流水线的步骤或者声明式流水线的 stage 中的 steps 代码块,但是其并没有包含用于定义声明式流水线的 section(节段)和 directive(指令)。声明式指令生成器(Declarative Directive Generator)这个工具可以做到这点。和 片段生成器类似,指令生成器允许你选择声明式的指令,对其以一种方式进行配置,然后生成这个指令的配置,让你将其用于声明式流水线。
要使用声明式指令生成器生成一个声明式的指令:
- 从已配置好的流水线导航到 Pipeline Syntax/流水线语法 链接(见上),然后点击侧栏的 Declarative Directive Generator,或直接访问
${YOUR_JENKINS_URL}/directive-generator。- 在下拉菜单中选择需要的指令。
- 使用下拉菜单下面动态生成的区域配置已选的指令。
- 点击 Generate Declarative Directive 生成一个能够被复制到流水线中的指令配置。
¶流水线模板
根据自己调试流水线的经验,和实际的需要,写了一个模板。包含环境变量、选项、触发器、stage以及构建失败的邮件发送。
1 | pipeline { |
¶常用代码块
¶环境变量
environment 指令可以设置全局变量或局部变量。放在pipeline下面是全局变量,放在stage下面是局部变量。如下是官方文档给的示例,CC是一个全局环境变量。AN_ACCESS_KEY是一个局部变量。参考environment。
在shell指令中,直接使用$ENVNAME引用环境变量。在echo指令中,使用$env.ENVNAME引用环境变量,且必须用双引号。
1 | pipeline { |
¶选项
options指令可以控制流水线的形为。文档options。可以借助声明式指令生成器来自动生成相关代码。options指令需要放在pipeline的下面。

官方示例。
1 | pipeline { |
¶触发器
triggers指令用于定义流水线自动运行的方式。可以周期性定时运行,也可以外部事件触发运行,例如有代码提交到Gerrit。同样可以借助声明式指令生成器来自动生成相关代码。参考triggers。triggers指令需要放在pipeline的下面。

官方示例。
1 | // Declarative // |
¶参数
parameters指令定义了一个参数列表,在触发流水线任务的时候需要提供这些参数。参考parameters。可以借助声明式指令生成器来自动生成相关代码。parameters指令需要放在pipeline的下面。

下面是一个官方的示例。在shell中,直接使用$PARAMNAME引用参数,在echo指令中,使用$params.PARAMNAME引用参数,且必须是双引号。
需要注意的是,如果修改了参数的配置,用旧的参数列表跑一次后,再跑一次才会是新的参数列表。
1 | pipeline { |
¶post
post段定义了一个或多个步骤,在stages运行完之后运行。可以根据不同的条件运行不同的步骤。例如构建失败发送邮件。参考post。post块需要放在pipeline的下面。可以借助声明式指令生成器来自动生成相关代码。post块支持多种条件块,如下表所示。
| 条件 | 说明 |
|---|---|
| always | Always run, regardless of build status |
| changed | Run if the current builds status is different than the previous builds status |
| fixed | Run if the previous build was not successful and the current builds status is “Success” |
| regression | Run if the current builds status is worse than the previous builds status |
| aborted | Run when the build status is “Aborted” |
| failure | Run if the build status is “Failure” |
| success | Run if the build status is “Success” or hasnt been set yet |
| unstable | Run if the build status is “Unstable” |
| unsuccessful | Run if the current builds status is “Aborted”, “Failure” or “Unstable” |
| cleanup | Always run after all other conditions, regardless of build status |
| notBuilt | Run if the build status is “Not Built” |
示例如下。在官方示例的基础上加了一个unsuccessful,表示在构建终止、失败或不稳定时发送邮件。
1 | pipeline { |
¶邮件
jenkins自带的mail指令提供了基本的邮件发送功能。可以通过片段生成器生成相关代码。
1 | mail( |

Email Extension 插件提供了更多的功能。安装插件后,可以在片段生成器找到emailext。
另外,发送邮件还需要在系统管理 -> 系统配置中设置邮件服务器和发件人。
¶错误捕获
可以通过catchError指令捕获错误,进行一些错误处理或忽略错误。如下示例所示,如果没有新的commit,git push指令会失败,但这个错误其实是可以忽略的。
1 | pipeline { |
可以通过片段生成器生成相关代码。

¶克隆代码仓库
在片段生成器使用git或checkout生成克隆代码仓库的指令。checkout支持的选项更多,且支持更多的代码仓库。

